

Introduction
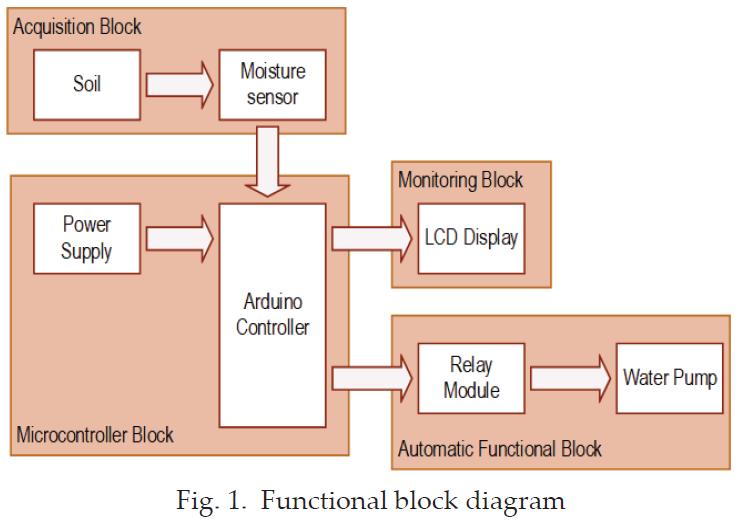
Efficient irrigation systems are key to promoting healthy plant growth while conserving precious water resources. By leveraging the capabilities of Arduino, an open-source electronics platform, you can create an automated irrigation system that optimizes water usage. In this comprehensive guide, we will walk you through the process of building an Arduino-based irrigation system, providing practical examples along the way.
Components Needed
To embark on this project, gather the following components:
- Arduino board (e.g., Arduino Uno)
- Soil moisture sensor
- Water pump
- Relay module
- Solenoid valve
- Power supply
- Jumper wires
- Water reservoir
- Tubing and fittings
- Optional: LCD display, buttons, and other peripherals for enhanced user interface
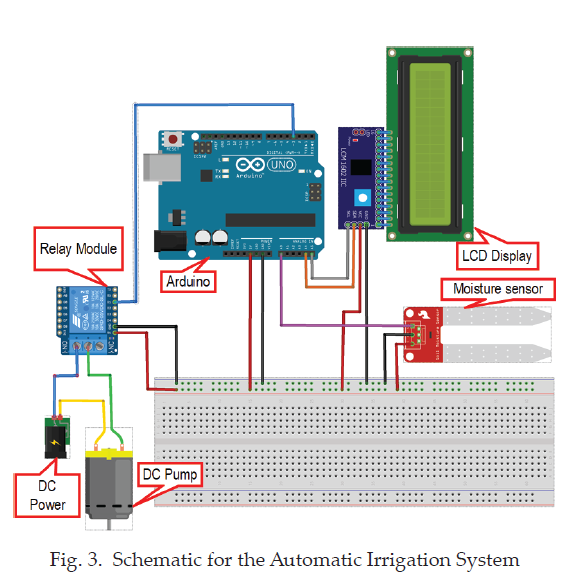
Step 1: Hardware Setup for Your Arduino-Based Irrigation System
- Establish a connection between the Arduino board and your computer using a USB cable and install the Arduino IDE (Integrated Development Environment) if you haven’t done so already.
- Connect the soil moisture sensor to the Arduino board, ensuring the proper wiring of power, ground, and analog input connections.
- Integrate the relay module with the Arduino, enabling control over the power supply to the water pump and solenoid valve.
- Wire the water pump and solenoid valve to the relay module, adhering closely to the manufacturer’s instructions for accurate wiring.
- Connect the power supply to both the Arduino board and the relay module, ensuring the power source can adequately meet the voltage and current requirements of the components.

Step 2: Crafting the Code for Your System
- Launch the Arduino IDE and create a new sketch.
- Define the necessary pin connections and variables for smooth operation.
- Configure the input and output pins to establish effective communication.
- Develop a loop function that continuously reads the moisture levels detected by the soil moisture sensor.
- Utilize the moisture readings to determine when to activate or deactivate the water pump and solenoid valve, effectively managing irrigation cycles.
- Enhance your system with additional features such as an LCD display or buttons for user interaction and control.
- Upload the finalized code to your Arduino board.
Step 3: Constructing Your Irrigation System
- Position the soil moisture sensor within your garden or plant bed to ensure accurate readings.
- Elevate the water reservoir to leverage gravity for improved water flow.
- Connect the water pump to the water reservoir using the appropriate tubing.
- Establish a connection between the solenoid valve and the water pump using additional tubing.
- Attach the irrigation tubing to the solenoid valve and position it strategically to deliver water effectively to your plants.
- Prioritize secure connections throughout the system to prevent leakage and ensure smooth operation.
Step 4: Testing and Calibration
- Power up the Arduino and observe the readings provided by the soil moisture sensor.
- Adjust the threshold values within the code to determine the ideal moisture levels that trigger the irrigation system’s activation or deactivation.
- Monitor the system’s behavior, ensuring it accurately responds to moisture levels and activates the water pump and solenoid valve as intended.
- Fine-tune the code and calibration as necessary, ensuring optimal performance.
Real-World Practical Example
Imagine you possess a small vegetable garden with an Arduino-controlled irrigation system. This system continuously measures soil moisture levels and activates irrigation when the moisture falls below a specific threshold. By incorporating real-time data, considering weather conditions and plant requirements, this Arduino-based system ensures your plants receive the optimal amount of water, preventing both overwatering and underwatering.
Conclusion
With Arduino as your ally, constructing a cost-effective and efficient irrigation system becomes a reality. This article provided an in-depth guide for building an Arduino-based irrigation system, empowering you to optimize water usage and nurture thriving plants. By implementing these techniques, you can maximize plant growth while promoting water conservation.
I have read so many articles on the topic of the blogger lovers however
this paragraph is truly a pleasant article, keep it
up.
Great information. Lucky me I came across your website by accident (stumbleupon).
I have saved it for later!
I constantly spent my half an hour to read this website’s content all the time along with a mug
of coffee.
Your article was indeed entertaining. I look forward to further agreeable contributions from you. However, how might we communicate?
Hi i think that i saw you visited my web site thus i came to Return the favore I am attempting to find things to improve my web siteI suppose its ok to use some of your ideas
I sincerely appreciated the effort you’ve invested here. The sketch is tasteful, your authored material chic, however, you seem to have developed some uneasiness about what you aim to offer henceforth. Certainly, I shall revisit more regularly, just as I have been doing nearly all the time, should you uphold this climb.
I’ve been visiting this site for years, and it never fails to impress me with its fresh perspectives and wealth of knowledge. The attention to detail and commitment to quality is evident. This is a true asset for anyone seeking to learn and grow.
The breadth of knowledge compiled on this website is astounding. Every article is a well-crafted masterpiece brimming with insights. I’m grateful to have discovered such a rich educational resource. You’ve gained a lifelong fan!