

This project is base on Arduino Uno R3 therefore the article going to explain how to setup the unit to display value on LCD. Here we are using a sensors value to display on Arduino. in other words, any sensor can be plunged to get their values. Let’s begin with the list of components;
List of components
- Arduino Uno R3 or Genuine Uno
- Jumper wires
- Solder-less breadboard
- Rotary Potentiometer
- 16 X 2 LCD standard Adafruit (white on blue)
- 103 trim pot PotentiometerRMO65 10K Ohm
- 102 trim pot PotentiometerRMO65 1K Ohm
You could select any of the color display as a result here I selected LCD is display in blue and the font will be display as white.
About the project
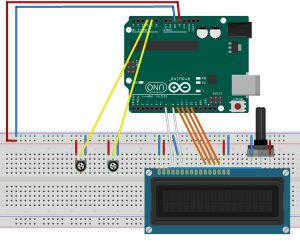
The project uses 2 Potentiometers, breadboard link to an Arduino and LCD. Meanwhile the outcome of the project is that the LCD should designate the values of Potentiometers when they are adjusted.
Let’s Assemble Arduino
The LCD configuration is looks like below;
There are some specific pins you should know well before starting our journey out of above pins in the diagram.
- Ground Connection – GND
- +5v Connection – VCC
- Analog pin used for screen brightness, connects to Potentiometer – VO
- The ping which tell LCD what will be written to it – RS
- The read/write pins – R/W
- The ping which tell the LCD whether data is ready. – E
- Bus lines for the LCD (Arduino to LCD) – D0 to D7
- +5V for the backlight – A
- Ground pin for the backlight – K
Steps of wiring
- Tie the 10K Ohm Potentiometer. The central pin of Potentiometer is linked to the VO pin and the extra two wires are connected to +5V and ground on the breadboard. As a result this Potentiometer is used to switch the contrast of the LCD.
- Tie pin-A to the +5V and pin-K to ground on the breadboard.
- Join pin-D7 to digital pin 12, pin-D6 to digital pin 11, pin-D5 to digital pin 10 and pin-D4 to digital pin 9 in digital pins are on the Arduino.
- Link pin-RS to digital pin 7 on the Arduino.
- Connect pin-RW to ground on the breadboard.
- Fix pin-VSS to ground on the breadboard.
- Join pin-VDD to +5V on the breadboard.
- Attach pin-E to digital pin 8 on the Arduino.
- Locate the primary Potentiometer on the board and link the middle pin to Analog Pin 1 on the Arduino and the additional pins to ground and +5V on the breadboard.
- Select the subsequent Potentiometer on the board and join the midpoint pin to Analog Pin 2 on the Arduino and the extra pins to ground and +5V on the breadboard.
Source Code Implementation
// include the library
#include <LiquidCrystal.h>
// initialize the library with the numbers of the interface pins
LiquidCrystal lcd(7,8,9,10,11,12);
int potPin1 = A1;
int potPin2 = A2;
void setup()
{
// set up the LCD’s number of columns and rows
lcd.begin(16, 2);
lcd.clear();
pinMode(potPin1, INPUT);
pinMode(potPin2, INPUT);
}
void loop()
{
lcd.setCursor(0,0); // Sets the cursor to col 0 and row 0
lcd.print(“SensorVal1: “); // Prints Sensor Val: to LCD
lcd.print(analogRead(potPin1)); // Prints value on Potpin1 to LCD
lcd.setCursor(0,1); // Sets the cursor to col 1 and row 0
lcd.print(“SensorVal2: “); // Prints Sensor Val: to LCD
lcd.print(analogRead(potPin2)); // Prints value on Potpin1 to LCD
}
You can copy the code and upload to the Arduino and fine-tune the Potentiometers as per your requirement. The LCD display will demonstration two lines with the values of respective Potentiometers . For instance, you can alter the B10K Potentiometer to guarantee the divergence of the LCD is faultless to the read the value.
Most importantly, for this project you can add different sensors in order to get their value to the digital screen. PIR sensor, IR sensor etc are some example. While you can combine several sensor to the same Arduino to get their values and however it will value added to your knowledge how the devices are behave and its value patterns.